Upgrade a simple HTML, CSS and JS site to a WebSocket application
Intro
Sarvesh, one of my friends, created a gaming project called “Pig Game” during his Javascript learning journey. It is a basic site built using HTML, CSS, and JS in which two people compete by rolling a die.
At any moment, you have two options: roll the dice to increase your score or give up so that the next person may play. The catch is that if the dice stop at 1, your current score becomes 0, and the game is passed to the next player. But if you willingly pass the game to the next person, your current score gets added to the total score which ultimately saves your hard work.
For the time being, this game is only a static web page with all of its capabilities running in the browser. And because of this, it is unplayable if you are not in the same room (or virtually sharing the screen of the host). We want to make this a server-based game so that we may play together even from afar.
Here, let’s implement a WebSocket server using express.js & socket.io. Also, we’ll configure the front-end to establish a connection with this server.
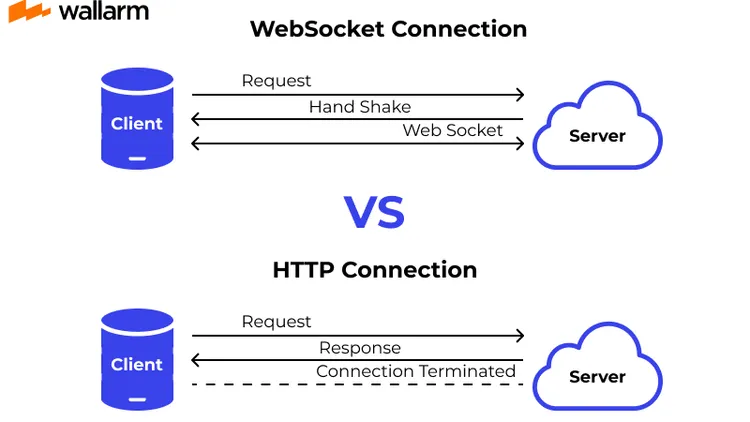
HTTP vs WebSocket protocols
HTTP
Let’s have a bird-eye view of the traditional HTTP protocol. With HTTP, a client sends a request to the server and the server process the request and sends a response in return. The connection is then closed after this request-response cycle. HTTP is stateless and because it runs on TCP, data delivery is ensured.
A stateless protocol does not require the server to retain information or status about each user for the duration of multiple requests. — wikipedia
You will be required to use cookies or server-side sessions to not forget the user in an HTTP protocol.
WebSocket
WebSocket is a bidirectional communication between server and client. Here, both the server and client are allowed to send information to each other while remembering their identity. The connection will be closed only when either client or server decides to close the connection.
First, a client requests that the server connects to it. Following a specific secret exchanged between them, a hidden consistent tunnel is established.
WebSocket provides a huge performance bump in the case of high-frequency data transfers because the connection time reduces to zero.
A continuous connection demands battery power. You should be cautious while connecting to a WebSocket with a mobile device.
And I’m not suggesting you forcefully close your Instagram (or any other messaging app) after each run. This caution is required during the designing phase. The client and server should be designed to prevent an instance from running for a longer period while keeping it long enough not to terminate earlier than required.
Pig Game (initially)
Below is the directory structure of the project. The index.html file contains the canvas for the game. script.js contains the game logic (my main focus). This is an HTML, CSS and JS page in which all the logic runs on the browser’s side.
> tree
.
├── assets
│   └── images
│       └── dice-*.png
├── index.html
├── script.js
└── style.css
You can find the source code of my forked copy of Sarvesh’s game here. Let’s get a bird’s eye view of the script.js file.
script.js
// The first few lines of the code contains button references and other variable declaration.
...

// The init function runs as soon as the browser reads the JavaScript
const init = function() {
    ...
    // TODO: We'll establish a connection to the server here
}

// This part of the code changes the active player
// TODO: We'll modify this as the state of a player will be stored with the server
const switchPlayer = function() {
    ...
}

// Below are button click handler
// TODO: Minor changes would be required here
// Button roll will happen on the server and the result will be broadcasted to the player
btnRoll.addEventListener('click', function(){
    ...
});

// The active player data will be synced with the server
btnHold.addEventListener('click', function(){
    ...
});

// Resets the server to the original state
btnNewGame.addEventListener('click', init)
Implementing the WebSocket version
Let’s create a server for accepting a WebSocket connection. We’ll use Express and Socket.Io for this.
As per node.js, we’ll need a package.json file describing our project. Dependencies can be added using npm install command.
package.json
{
    "name": "pig-game-socket",
    "version": "2.0.0",
    "description": "This is a multiplayer game",
    "dependencies": {
        "express": "^4.18.2",
        "socket.io": "^4.5.4"
    }
}
But first, let’s create a route for sending our game to the client. For this move your game contents to a directory named public. And that’s all. Now we can instruct the express app to use this directory for serving the contents (HTML, CSS and JS). Also, create a server.js file in the root directory.
The final directory structure will look like this,
> tree .
.
└── public
│   ├── assets
│   └── images
│    │       └── dice-*.png
│    ├── index.html
│    ├── script.js
│    └── style.css
└── server.js
server.js
const express = require('express');
const app = express();
const http = require('http');
const server = http.createServer(app);

app.use(express.static("public"));

server.listen(3000, () => {
  console.log('listening on *:3000');
});
We can create a route to serve the contents on the public folder using app.use(). Now, you can run the server using node server.js Visiting localhost:3000 will direct you to the same game window.
Implementing a socket connection
Let’s extend server.js to listen to the socket connection. This can be done by supplying a special string, ‘connection’ to io.on() as an argument. io.on('connection') helps us to respond to a connection request and perform a handshake with the client. Similarly, ‘disconnect’ allows you to respond when a connection is closed or the client goes offline.
Note: ‘connection’ acts on
iowhile ‘disconnect’ acts onsocket.
The process of request and a handshake can be done with just a single line of code using socket.io
server.js
...
const { Server } = require("socket.io");
const io = new Server(server);
...
io.on('connection', (socket) => {
    console.log('Client connected');
    socket.on('disconnect', () => {
        console.log('Client disconnected');
    });
});
On the client side, we’ll initialize a connection as soon as the page renders our JavaScript. For this, you can first load the socket.io library on the client side. This can be done by adding a CDN URL to socket.io on the client side.
public/index.html
<HEAD>
    ...
    <script src="https://cdn.socket.io/4.5.4/socket.io.min.js"></script>
</HEAD>
On the script.js file, we will expose a global socket variable to interact with the messaging.
public/script.js
let socket; // Define a global variable referring to our connection

// And let's initialize this inside the init function
const init = function() {
    ...
    // io() is a special function provided by the CDN
    socket = io();
}
In case your server is not defined inside the default route, you will need to configure
ioby providing the URL of your server.
Now, by visiting localhost:3000 you can trigger a connection request to the server. This can be verified by observing the server console. You can also check the disconnect event by refreshing the page.
> node server.js
listening on *:3000
Client connected
Client disconnected
Client connected
Now, you can also use socket id to identify multiple socket connections (or clients).
socket.idis not a recommended way of identifying a client at the server end. But for us, it’s not going to be a huge problem as we don’t want to identify a user strictly.
server.js
io.on('connection', (socket) => {
    console.log('Client connected ' + socket.id);
    socket.on('disconnect', () => {
        console.log('Client disconnected ' + socket.id);
    });
});
listening on *:3001
Client Connected g1qGI2Sy9TsHbf4RAAAB
Client Connected aNeWtqI27uJuC49IAAAD
Client disconnected g1qGI2Sy9TsHbf4RAAABSharing messages between the server and clients
Before jumping into message sharing, let’s discuss what kind of messages we want to share b/w the clients and the server.
1. First is this special message called, 'connection' that establishes our WebSocket connection
2. We can send a 'ready' message once both the players have joined the session
3. We don't want more than 2 players to be active at a time, so we'll 'reject' further connections. We might want to add viewer support but that's for version v3.0.0
4. Notify the server about each step taken by the player (roll/hold)
5. Server broadcasts the current and total scores after each move and changes the active player
6. After the game ends, server notifies the result
I think that’s all we need to talk about at least during the starting phase.
Steps 2 and 3: Onboarding the players
The first step is already taken care of by ‘socket.io’. Let’s configure our server for steps 2 and 3. We want to send a ‘ready’ signal when 2 players are connected. If more than 2 people join, we can reject their connection on the server side using socket.disconnect() function and send them a ‘reject’ signal.
socket.emit()sends the message to a particular socket (client),socket.broadcast.emit()sends the message to everyone except the socket (client) itself andio.emit()sends the message to all the clients connected to a socket.
server.js
...
let players = {};    // This will store the details about the players like their score
let activePlayer = 0;

io.on('connection', (socket) => {
  players[socket.id] = {    // Initialize the player on establishing a connection
    "socket": socket,
    "total_score": 0,
    "current_score": 0,
    "isActivePlayer": false,
  }
  let total_players = Object.keys(players).length
  console.log(`Player with socket id ${socket.id} connected.`)
  console.log(`Total number of players: ${total_players}`)

  // Sending the connection status
  // Reject if we already have 2 players connected
  if (total_players > 2) {
    delete players[socket.id]
    socket.emit("connection_status", {"connection_status": "reject"});
    socket.disconnect();
    console.log("Already 2 players are onboarded", Object.keys(players))
  }
  // Send ready signal when we have 2 players
  else if (total_players == 2) {
    // Tell player 1 to go first
    activePlayer = 0
    io.emit("connection_status", {"connection_status": "ready", "active_player": Object.keys(players)[activePlayer]})
  // Else send a waiting signal
  else {
    io.emit("connection_status",  {"connection_status": "waiting"})
  }

  socket.on('disconnect', () => {
      delete players[socket.id];
      console.log('Client disconnected ' + socket.id);
  });
});
On the client side, we will consume the messages received to perform certain actions. This can be done by adding a socket message listener, socket.on(). Right now, let’s use alerts for notifying the current player about the game status.
public/script.js
socket.on("connection_status", (args) => {
    console.log("Received a connection_status signal", args.connection_status)
    if (args.connection_status === 'waiting') {
        alert("Waiting for second player to begin the game")
    }
    else if (args.connection_status === 'ready') {
        // Enable player is a function to activate and deactivate the roll and hold buttons
        EnablePlayer(args.active_player);
        alert(`Let's begin the game. ${args.active_player===socket.id ? "It's your turn" : "Oponent's turn"}`)
    }
    else if (args.connection_status === 'reject') {
        alert("Can't join, already 2 players onboarded")
    }
});
Step 4: Play the game
Looks like this is all we wanted in the steps 2 and 3. For step 4, we will send a signal from the client’s side about his decision. This can be achieved by the button event listners. And the server will calculate a random number b/w 1 to 6 and broadcast the response.
public/script.js
...
// Same for btnHold with decision "hold"
btnRoll.addEventListener('click', function(){
    if(playing){
        socket.emit("decide", {
            "player_id": socket.id,
            "decision": "roll"
         });
    }
});
...
On the server, we can decide the score and broadcast it back to clients. We will send the current and total scores of the player along with the next player’s socket id and dice score.
server.js
...
 function NotifyScores(active_player, dice) {
    let player1 = Object.keys(players)[0];
    let player2 = Object.keys(players)[1];

    io.emit("score_update", {
      'player1_current': players[player1].current_score,
      'player1_total': players[player1].total_score,
      'player2_current': players[player2].current_score,
      'player2_total': players[player2].total_score,
      'next_turn': Object.keys(players)[activePlayer],
      'acitive_player_roll': activePlayer,
      'dice': dice
    });
  }

  socket.on("decide", (args) => {
    console.log("decide", args);
    if (args.player_id === Object.keys(players)[activePlayer]) {
      if (args.decision === 'roll'){
        const dice = Math.trunc(Math.random()*6) + 1;
        players[args.player_id].current_score = dice == 1
          ? 0
          : players[args.player_id].current_score + dice;
        activePlayer = dice == 1 ? (activePlayer + 1) % 2 : activePlayer
        NotifyScores(activePlayer, dice);
      }
      else if (args.decision === 'hold') {
        players[args.player_id].total_score += players[args.player_id].current_score;
        players[args.player_id].current_score = 0;
        activePlayer = (activePlayer + 1) % 2;
        NotifyScores(activePlayer, 0);
      }
    }
  });
Step 5: Update the scores
Step 5 is very simple. Just update the data received by the client from the server in step 4.
public/script.js
socket.on("score_update", (args) =>{
    console.log("score update", args);
    document.getElementById(`current--0`).textContent = args.player1_current;
    document.getElementById(`current--1`).textContent = args.player2_current;
    document.getElementById(`score--0`).textContent = args.player1_total;
    document.getElementById(`score--1`).textContent = args.player2_total;
    diceEl.classList.remove('hidden');
    if (args.dice != 0) diceEl.src = `assets/images/dice-${args.dice}.png`;
    EnablePlayer(args.next_turn)
});
Step 6: Decide the winner
Step 6, is deciding the winner. Whoever scores greater than 60 will be entitled the winner. We have many options to send this information. This can be sent by the server as a new event, “winner”. Or we can include this with the ‘score_update’ event.
Let’s update the “decide” event to send a new message whenever a player wins.
server.js
 socket.on("decide", (args) => {
    if (args.player_id === Object.keys(players)[activePlayer]) {
      ...
      else if (args.decision === 'hold'){
        ...
        players[args.player_id].total_score += players[args.player_id].current_score;
        players[args.player_id].current_score = 0;

        // Deciding the winner
        if (players[args.player_id].total_score >= 60) {
            io.emit("winner", activePlayer);
        }
        else {
            activePlayer = (activePlayer + 1) % 2;
            NotifyScores(activePlayer, 0);
        }
      }
      ...
    }
 });
This can be updated on the client side.
public/script.js
socket.on("winner", (winner) => {
    playing = false;
    document.querySelector(`.player--${winner}`).classList.add('player--winner');
    document.querySelector(`.player--${winner}`).classList.remove('player--active');
});
This is it, now you can play the game with your friend. You can always host it online using ngrok. Now what’s left is adding more features like adding an in-game chat, viewers, a gaming room and much more. Also, there is a need to clean the code.
Conclusion
In this blog, we witnessed the working of a WebSocket app using Socket.io. We focused on establishing a connection and sending messages from server to client as well as from client to server. There are 3 ways in which the messages can be communicated, io.emit(), socket.emit() and socket.broadcast.emit(). io.emit() is used for broadcasting the message to all the clients. socket.broadcast.emit() broadcasts the message to all the clients except the active client. socket.emit() is for server to client or client to server messaging. For receiving the messages we implement a listener, that triggers on receiving a specific event as defined by us. We also saw some special events like connection and disconnect.