Automate your local environment setup using dev containers
Index
| Topic | Description |
|---|---|
| Problem | Automate the set up process for the projects |
| Dev Containers | What are dev containers? |
| Dev container custom configurations | Configuring a dev container as per your needs. |
| Open your container in VSCode | How to open a dev container in VSCode. |
| Open your container in a browser | Opening dev container in github.devtext editor. |
| Creating a dev container using templates available | Java and Postgres (as service) dev container set up. |
| Adding fish terminal to the dev container | Using fish shell and setting the default shell for a container. |
| oh-my-zsh with powerlevel10k | Using zsh along with oh-my-zsh and powerlevel10k. |
| Make the dev container distributable | You should not add personal changes to source control. Use external script to modify the dev container configurations. |
| Conclusion | Final words |
Problem
I use a dual-booted ROG with Ubuntu 22.10 and Windows 10 for development, along with a MacBook Air 2020. Every time I begin a new project that makes use of a new tech stack, I am required to take some time to set up the environment on all 3 machines. And sometimes, my laziness compels me to use only one machine instead of setting up other ones. The issue is that I don’t want to go through the same setup process again and again.
The same problem exists on a bigger scale too. In GreyOrange, I’ve seen my supervisors spending a lot of time helping freshers set up their new laptops. And even after following the setup guide on confluence, it took me a lot of time to build my first project successfully. Imagine helping 300 freshers set up their laptops for a particular project.
Plus, the building process can be different for different Operating Systems. Wouldn’t it be great to use a system that your CICD platform uses?
This problem can be solved using dev containers that only require Docker and git installed on your machine.
Dev containers
Dev containers are just Docker containers that are fully equipped with the necessary tech stacks and tools to begin developing. Simply establish a connection with your container and begin writing code. Additionally, a version control program like git may be used to share this setup. So, anyone with a computer may run these Docker containers and begin developing them. GitHub codespace uses dev container configurations to set up their cloud development environment. You can also customize your dev container using the Dockerfile and docker-compose configurations.
Dev container custom configurations
A simple dev container configuration has a .devcontainer directory consisting of devcontainer.json and a Dockerfile. The devcontainer.json contains all the configurations used by the container while Dockerfile contains the instruction to create a Docker container. You can also use an image from the Docker hub directly by using the image attribute.
Directory structure
.devcontainer
├── Dockerfile
└── devcontainer.json
devcontainer.json
{
	"name": "Hello DevContainer",   // This is the name of the container

    // build defines the image configurations
    // Instead of building you can use `image` attribute to provide the docker image hosted on Docker hub
    "build": {
        "dockerfile": "Dockerfile", // This is the Dockerfile located at '.devcontainer/Dockerfile'
        "context": "..",            // This is where the project lies
        "args": {                   // Anything supplied to Dockerfile as an argument
            "PYTHON_VERSION": "3.9"
        }
    },

	// Features to add to the dev container. More info: https://containers.dev/features.
	// "features": {},

	// Use 'forwardPorts' to make a list of ports inside the container available locally.
	// "forwardPorts": [],

	// Will run these after the container is created
    // Generally used to install the dependencies
	// "postCreateCommand": "pip install -r requirements.txt",

    // You can use root as remoteUser but it's not advisable to do so
	"remoteUser": "root"
}
Dockerfile
ARG PYTHON_VERSION
FROM python:${PYTHON_VERSION}.0-slim
# And other setup instructions
Open your container in VSCode
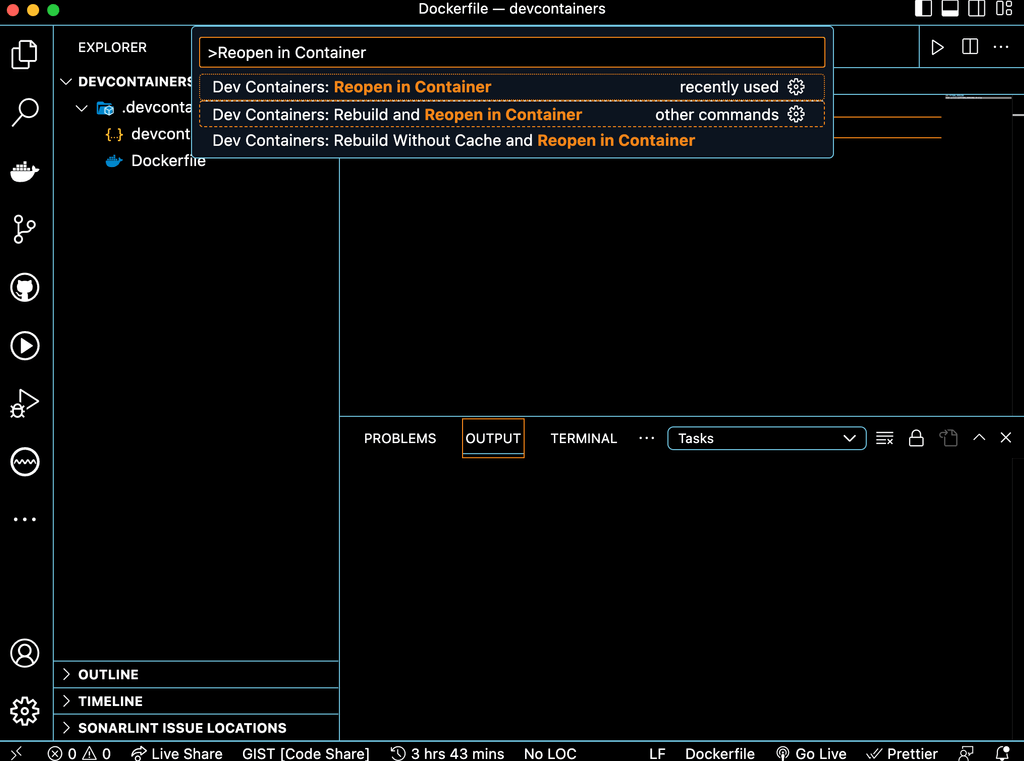
To connect to a dev container using VSCode, you need to install Dev Containers extension. You can open your current directory in a dev container by clicking F1 and selecting Dev Containers: Reopen in Container. You can also choose Dev Containers: Rebuild and Reopen in Container in case you want to build the Docker image once again.
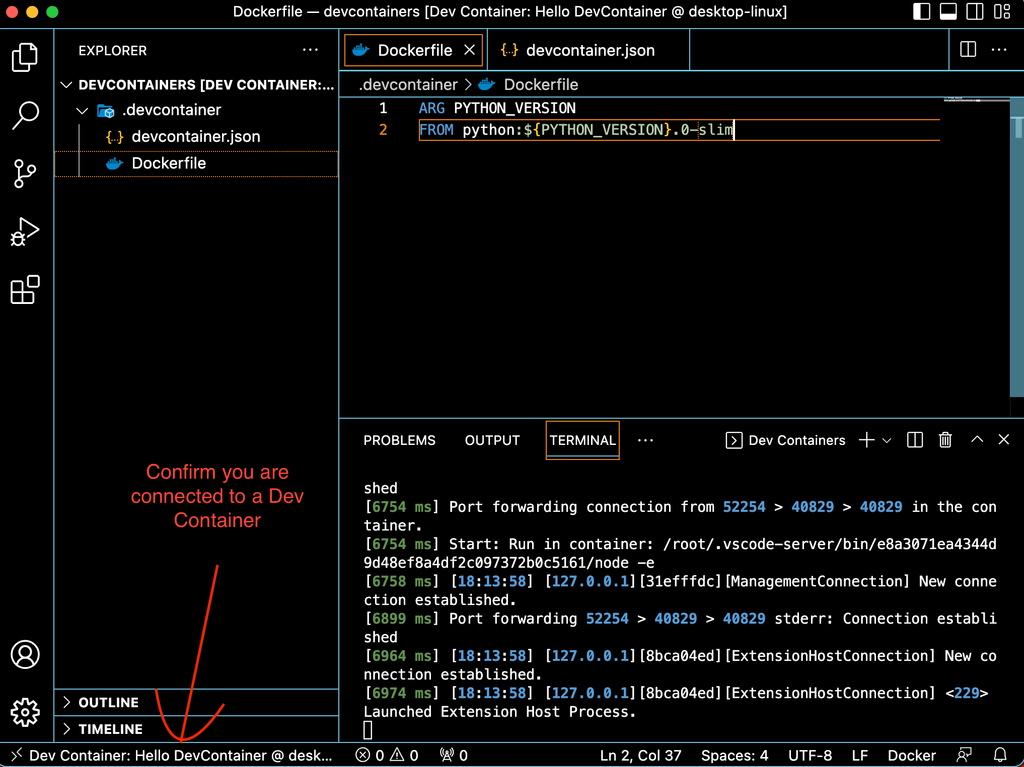
This will take some time in building the container and installing the tools. Once completed, you can verify the connection by looking at the left end of the VSCode window. It should display Dev Container: <Container name> @ <Operating system>
Note: The extensions are gone. For your dev container, you’ll need to add your extensions once again.
You can also check the python version to confirm if it’s installed properly.
> root@2a35d5d14816:/workspaces/devcontainers# python --version
Python 3.9.0
Open your container in a browser
You can also use the power of VSCode from your browser using github.dev editor. You need to host your project on GitHub for this to work. Let’s do that.
First, you will need to add git features in devcontainer.json file. This will enable us to use git and github cli from inside the container. You can also enable ssh using the sshd feature. A list of available features can be found at containers.dev/features.
    ...
    "features": {
        "ghcr.io/devcontainers/features/git:1": {},
        "ghcr.io/devcontainers/features/github-cli:1": {},
        "ghcr.io/devcontainers/features/sshd:1": {}
    },
    ...
Then rebuild the container by pressing F1 -> Rebuild Container. Now you can use git and gh inside your container.
> git init
> git add .
> git commit -m "Init"
> gh auth login # Here you can create a new ssh key for your container
> gh repo create hello-devcontainer --public --source . --push
✓ Created repository GO-Shubham-Kumar/hello-devcontainer on GitHub
✓ Added remote git@github.com:GO-Shubham-Kumar/hello-devcontainer.git
Enumerating objects: 5, done.
Counting objects: 100% (5/5), done.
Delta compression using up to 4 threads
Compressing objects: 100% (4/4), done.
Writing objects: 100% (5/5), 924 bytes | 71.00 KiB/s, done.
Total 5 (delta 0), reused 0 (delta 0)
To github.com:GO-Shubham-Kumar/hello-devcontainer.git
 * [new branch]      HEAD -> master
Branch 'master' set up to track remote branch 'master' from 'origin'.
✓ Pushed commits to git@github.com:GO-Shubham-Kumar/hello-devcontainer.git
The above procedure creates a new repository and pushes the project commits to it. I can see my project at https://github.com/GO-Shubham-Kumar/hello-devcontainer.
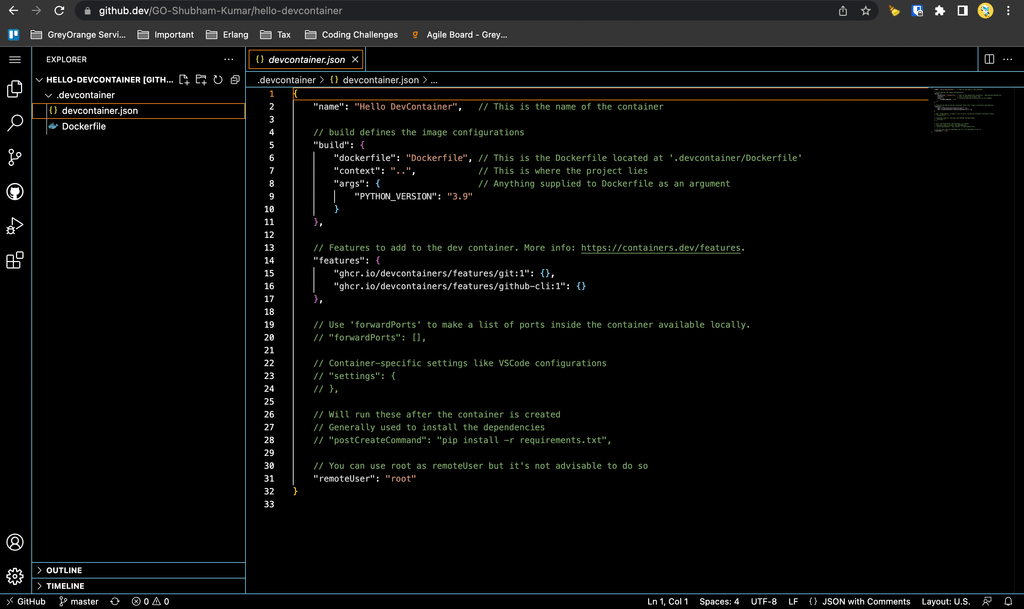
Now we have our code on GitHub. It’s time to open a devcontainer using gitub.dev. For this simply visit your GitHub repo and change the URL from github.com to github.dev. This will launch a new VSCode-style window with all your tools available.
Note: github.dev is a lightweight editor which does not support a terminal. If you want to use the terminal, you should switch to GitHub Codespaces.
Creating a dev container using templates available
Above, I showed you how to configure a dev container using a test repository. Now, I’ll show you how to use available templates to run services like PostgreSQL along with your container.
In GreyOrange, we have a project that uses SpringBoot and PostgreSQL. We need a list of databases to run the test case for this project. Let’s try to configure our dev container to have a PostgreSQL service along with the databases required.
Summary of things we need.
- Java 8 and Maven
- PostgreSQL 9.6
- Populate the databases
You can visit container templates to search for a required template. We will use, Java & Postgres template. This template allows us to configure the Java version, package manager and PostgreSQL version.
In case your template isn’t available, you will need to create your
Dockerfile&docker-composefiles.
From your VSCode editor, Click F1 -> Dev Containers: Add Dev Container Configuration Files.... Click on Show All Definitions and select Java & PostgreSQL. I’m using version 8-bullseye with Maven so I’ll select them. After a few moments, VSCode will create a .devcontainer directory with Dockerfile, docker-compose.yml & devcontainer.json.
Looking at the generated code it seems like we require some modifications for this to work properly.
We want to initialize the databases as per the
database_creator.sql. This file contains all the databases we require to run the test cases. This can be done by adding an entry to thedb->volumeas shown in thedocker-compose.ymlfile.The Java image should be
java:8-bullseye, notjava:0-8-bullseyewhich was generated by the generator.We need
Postgres:9.6, the generated one point to the latest image.
devcontainer.json
// For format details, see https://aka.ms/devcontainer.json. For config options, see the
// README at: https://github.com/devcontainers/templates/tree/main/src/java-postgres
{
	"name": "Java & PostgreSQL",
	"dockerComposeFile": "docker-compose.yml",
	"service": "app",
	"workspaceFolder": "/workspaces/${localWorkspaceFolderBasename}"
}
Dockerfile
# Changed java:0-8-bullseye to java:8-bullseye
FROM mcr.microsoft.com/devcontainers/java:8-bullseye

ARG INSTALL_MAVEN="true"
ARG MAVEN_VERSION=""

ARG INSTALL_GRADLE="false"
ARG GRADLE_VERSION=""

RUN if [ "${INSTALL_MAVEN}" = "true" ]; then su vscode -c "umask 0002 && . /usr/local/sdkman/bin/sdkman-init.sh && sdk install maven \"${MAVEN_VERSION}\""; fi \
    && if [ "${INSTALL_GRADLE}" = "true" ]; then su vscode -c "umask 0002 && . /usr/local/sdkman/bin/sdkman-init.sh && sdk install gradle \"${GRADLE_VERSION}\""; fi
docker-compose.yml
version: '3.8'

volumes:
  postgres-data:

services:
  app:
    container_name: javadev
    build:
      context: .
      dockerfile: Dockerfile
    environment:
      # NOTE: POSTGRES_DB/USER/PASSWORD should match values in db container
        POSTGRES_PASSWORD: postgres
        POSTGRES_USER: postgres
        POSTGRES_DB: postgres
        # We will populate the database using database_creator.sql
        # POSTGRES_HOSTNAME: postgresdb

    volumes:
      - ../..:/workspaces:cached
    command: sleep infinity

    # Runs app on the same network as the database container, allows "forwardPorts" in devcontainer.json function.
    network_mode: service:db

    # Use "forwardPorts" in **devcontainer.json** to forward an app port locally.
    # (Adding the "ports" property to this file will not forward from a Codespace.)

  db:
    container_name: postgresdb
    image: postgres:9.6
    restart: always
    volumes:
      # Run the below script as an initialization script
      - ../misc/database_creator.sql:/docker-entrypoint-initdb.d/database_creator.sql
      # We no longer require this
      # - postgres-data:/var/lib/postgresql/data
    environment:
      # NOTE: POSTGRES_DB/USER/PASSWORD should match values in app container
      POSTGRES_PASSWORD: postgres
      POSTGRES_USER: postgres
      # We will create our databases using misc/database_creator.sql
      # POSTGRES_DB: postgres

    # Add "forwardPorts": ["5432"] to **devcontainer.json** to forward PostgreSQL locally.
    # (Adding the "ports" property to this file will not forward from a Codespace.)
The above configurations will run PostgreSQL along with our app. You can also view this combination in Docker Desktop.

Note: Here I haven’t used
gitandghfeatures because the imagejava:8-bullseyealready comes with these tools.
Let’s verify the Java and Maven versions.
> java -version
openjdk version "1.8.0_352"
OpenJDK Runtime Environment (Temurin)(build 1.8.0_352-b08)
OpenJDK 64-Bit Server VM (Temurin)(build 25.352-b08, mixed mode)
> mvn -version
Apache Maven 3.8.7 (b89d5959fcde851dcb1c8946a785a163f14e1e29)
Maven home: /usr/local/sdkman/candidates/maven/current
Java version: 1.8.0_352, vendor: Temurin, runtime: /usr/local/sdkman/candidates/java/8.0.352-tem/jre
Default locale: en_US, platform encoding: UTF-8
OS name: "linux", version: "5.15.49-linuxkit", arch: "aarch64", family: "unix"
Let’s compile the project.
> mvn clean install
...
[INFO] BUILD SUCCESS
[INFO] ------------------------------------------------------------------------
[INFO] Total time:  35:03 min
[INFO] Finished at: 2023-01-08T00:05:51Z
[INFO] ------------------------------------------------------------------------
It took a while but the build was successful.
Adding fish terminal to the dev container
Right now, the dev container is using bash as it’s the default shell. There are a lot of shells that come along with this image.
> echo $SHELL
/bin/bash

> cat /etc/shells
/bin/sh
/bin/bash
/bin/rbash
/bin/dash
/bin/zsh
/usr/bin/zsh
Let’s try installing fish terminal which is not available by default. fish can be installed using the features option in devcontainer.json. A list of features is available here.
Modify the devcontainer.json as shown below and rebuild the container.
devcontainer.json
{
    ...
    "features": {
		"ghcr.io/meaningful-ooo/devcontainer-features/fish:1": {}
	}
}
Now, you can find fish in the list of available shells. And this feature also sets fish as your default terminal.
> cat /etc/shells
/bin/sh
/bin/bash
/bin/rbash
/bin/dash
/bin/zsh
/usr/bin/zsh
/usr/bin/fish   # This is it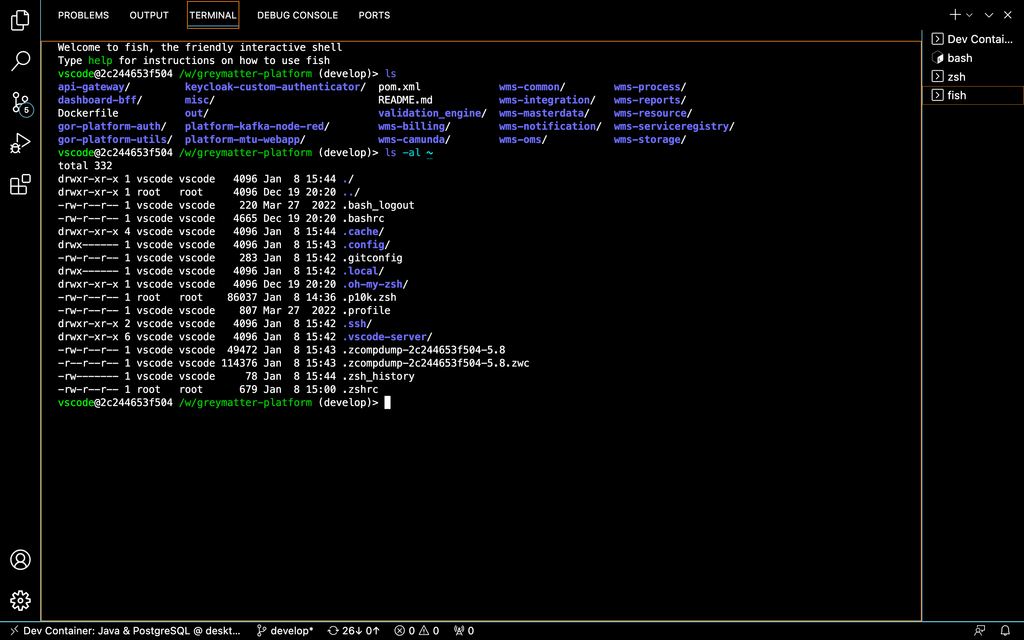
If you don’t want to set fish as your default terminal, you can specify the default terminal in devcontainer.json file as follows. This will set bash as your default container.
devcontainer.json
{
  ...
	"settings": {
		"terminal.integrated.defaultProfile.linux": "bash",
		"terminal.integrated.profiles.linux": {
			"bash": {
				"path": "bash"
				}
			}
		}
  ...
}
oh-my-zsh with powerlevel10k
fish is a great shell. But I want the dev container to feel like my local machine that has oh-my-zsh with powerlevel10k. At the time of writing this blog, I wasn’t able to find any features to install these things. So I went with configuring the Dockerfile itself to include these features.
Disclaimer: This is a very bad idea to directly change a source controlled dev container file as per your preference
This image already comes with oh-my-zsh. Powerlevel10k is a custom theme that I’ll need to install on my own. Same goes for zsh-syntax-highlighting and zsh-autosuggestions plugins.
Dockerfile
...
# Install powerlevel10k
RUN git clone --depth=1 https://github.com/romkatv/powerlevel10k.git /home/vscode/.oh-my-zsh/custom/themes/powerlevel10k
# Install zsh-autosuggestions
RUN git clone https://github.com/zsh-users/zsh-autosuggestions /home/vscode/.oh-my-zsh/custom/plugins/zsh-autosuggestions
# Install zsh-syntax-highlighting
RUN git clone https://github.com/zsh-users/zsh-syntax-highlighting.git /home/vscode/.oh-my-zsh/custom/plugins/zsh-syntax-highlighting
# This is my local machine's theme file
COPY .p10k.zsh /home/vscode
# This is the modified zsh configuration
COPY .zshrc /home/vscode
.p10k.zsh contains the powerlevel10k configurations. .zshrc contains the zsh configurations. These files are located inside the home directory. I just copied them to .devcontainer for an easy transfer to the dev container.
> tree -a .devcontainer
.devcontainer
├── .p10k.zsh
├── .zshrc
├── Dockerfile
├── devcontainer.json
└── docker-compose.yml
If you don’t have the
.p10k.zsh, you can skip the COPY step while building the container. Once inside the container, you can runp10k configureto generate the.p10k.zshfile. Then the contents of this file can be copied to.devcontainer/.p10k.zshfor future builds.
Below is my .zshrc file. You can verify the ZSH_THEME is set as powerlevel10k/powerlevel10k. I am just using 3 plugins. The git plugin is available by default. zsh-autosuggestions and zsh-syntax-highlighting were downloaded from GitHub.
# Enable Powerlevel10k instant prompt. Should stay close to the top of ~/.zshrc.
# Initialization code that may require console input (password prompts, [y/n]
# confirmations, etc.) must go above this block; everything else may go below.
if [[ -r "${XDG_CACHE_HOME:-$HOME/.cache}/p10k-instant-prompt-${(%):-%n}.zsh" ]]; then
  source "${XDG_CACHE_HOME:-$HOME/.cache}/p10k-instant-prompt-${(%):-%n}.zsh"
fi

export ZSH="$HOME/.oh-my-zsh"

ZSH_THEME="powerlevel10k/powerlevel10k"

plugins=(
	git
	zsh-autosuggestions
	zsh-syntax-highlighting
)

source $ZSH/oh-my-zsh.sh

# To customize prompt, run `p10k configure` or edit ~/.p10k.zsh.
[[ ! -f ~/.p10k.zsh ]] || source ~/.p10k.zsh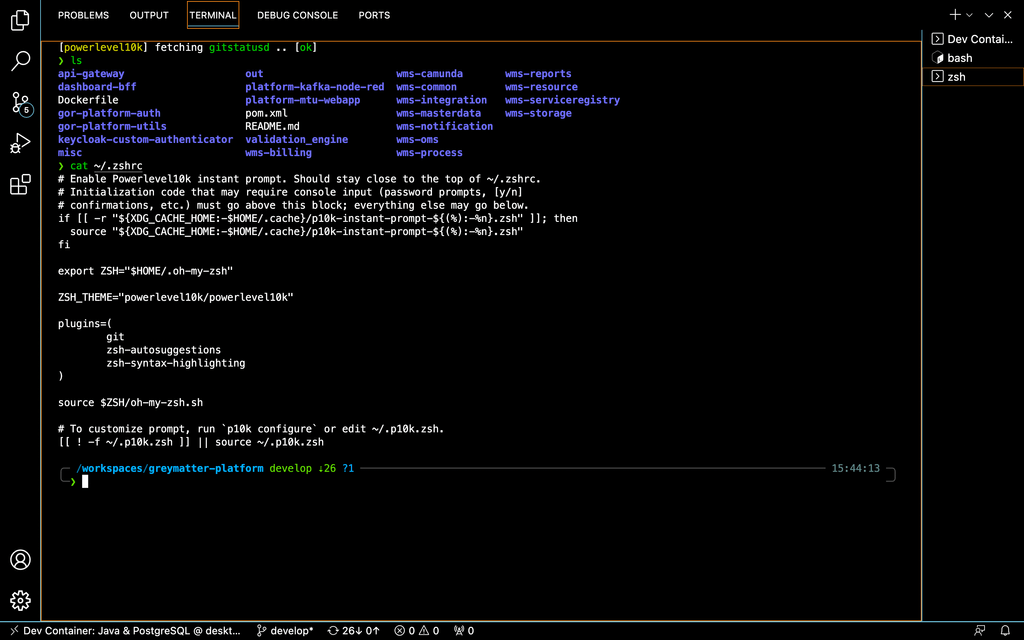
If there are multiple developers with their shell preference, modification of
Dockerfilefor a specific need is not a very good idea.
Make the dev container distributable
You should not change a source controlled Dockerfile to satisfy your need. The current Dockerfile contains the changes I made to suit my preference. I like zsh so I did some customization to Docker to support my theming style. If I commit these changes to the remote, this might become a problem for another developer who prefers some other shell or theme. Plus, if everyone starts making changes to the dev container configuration, this might result in merge conflicts.
In scenarios like this, you can use the git skip-worktree feature. After cloning the base repo, you don’t want to make any commits on the dev container. So you can tell git to ignore tracking the .devcontainer directory.
# Tell git to stop tracking these files
> git update-index --assume-unchanged .devcontainer/*

# View the files which are not being tracked
> git ls-files -v | grep "h" | grep dev
h .devcontainer/Dockerfile
h .devcontainer/devcontainer.json
h .devcontainer/docker-compose.yml
Now you can freely configure the dev container as per your need.
Actually, this is not the best way to deal with this problem at all, as this will ignore the
.devcontainerdirectory even in the case ofgit pull. And if you do the reverse usinggit update-index --no-assume-unchanged .devcontainer/*, you will need to commit or discard your changes before proceeding.
The best way I can think of to deal with this problem is by keeping the personal installations away from the git repository.
For this, let’s create an external script that will install powerlevel10k and other plugins using the docker commands.
First, let’s move our .zshrc and .p10k.zsh to a new directory out of our repository. I’m creating a hidden directory in the home directory for this.
> mkdir ~/.personal-devcontainer
> mv .devcontainer/.zshrc ~/.personal-devcontainer
> mv .devcontainer/.p10k.zsh ~/.personal-devcontainer
Also, let’s reset the devcontainer.json, Dockerfile and docker-compose.yml to the unbiased version.
devcontainer.json
// For format details, see https://aka.ms/devcontainer.json. For config options, see the
// README at: https://github.com/devcontainers/templates/tree/main/src/java-postgres
{
	"name": "Java & PostgreSQL",
	"dockerComposeFile": "docker-compose.yml",
	"service": "app",
	"workspaceFolder": "/workspaces/${localWorkspaceFolderBasename}"
}
Dockerfile
# Changed java:0-8-bullseye to java:8-bullseye
FROM mcr.microsoft.com/devcontainers/java:8-bullseye

ARG INSTALL_MAVEN="true"
ARG MAVEN_VERSION=""

ARG INSTALL_GRADLE="false"
ARG GRADLE_VERSION=""

RUN if [ "${INSTALL_MAVEN}" = "true" ]; then su vscode -c "umask 0002 && . /usr/local/sdkman/bin/sdkman-init.sh && sdk install maven \"${MAVEN_VERSION}\""; fi \
    && if [ "${INSTALL_GRADLE}" = "true" ]; then su vscode -c "umask 0002 && . /usr/local/sdkman/bin/sdkman-init.sh && sdk install gradle \"${GRADLE_VERSION}\""; fi
docker-compose.yml
version: '3.8'

volumes:
  postgres-data:

services:
  app:
    container_name: javadev
    build:
      context: .
      dockerfile: Dockerfile
    environment:
      # NOTE: POSTGRES_DB/USER/PASSWORD should match values in db container
        POSTGRES_PASSWORD: postgres
        POSTGRES_USER: postgres
        POSTGRES_DB: postgres
        # We will populate the database using database_creator.sql
        # POSTGRES_HOSTNAME: postgresdb

    volumes:
      - ../..:/workspaces:cached
    command: sleep infinity

    # Runs app on the same network as the database container, allows "forwardPorts" in devcontainer.json function.
    network_mode: service:db

    # Use "forwardPorts" in **devcontainer.json** to forward an app port locally.
    # (Adding the "ports" property to this file will not forward from a Codespace.)

  db:
    container_name: postgresdb
    image: postgres:9.6
    restart: always
    volumes:
      # Run the below script as an initialization script
      - ../misc/database_creator.sql:/docker-entrypoint-initdb.d/database_creator.sql
      # We no longer require this
      # - postgres-data:/var/lib/postgresql/data
    environment:
      # NOTE: POSTGRES_DB/USER/PASSWORD should match values in app container
      POSTGRES_PASSWORD: postgres
      POSTGRES_USER: postgres
      # We will create our databases using misc/database_creator.sql
      # POSTGRES_DB: postgres

    # Add "forwardPorts": ["5432"] to **devcontainer.json** to forward PostgreSQL locally.
    # (Adding the "ports" property to this file will not forward from a Codespace.)
Now, let’s create a bash script inside ~/.personal-devcontainer that will change the container configuration as per our preference (personal changes).
> cd ~/.personal-devcontainer
> touch install.sh
> chmod +x install.sh
> vim install.sh
install.sh
# This will work on a running dev container
CONTAINER_NAME=$1
docker exec $CONTAINER_NAME git clone --depth=1 https://github.com/romkatv/powerlevel10k.git /home/vscode/.oh-my-zsh/custom/themes/powerlevel10k
docker exec $CONTAINER_NAME git clone https://github.com/zsh-users/zsh-autosuggestions /home/vscode/.oh-my-zsh/custom/plugins/zsh-autosuggestions
docker exec $CONTAINER_NAME git clone https://github.com/zsh-users/zsh-syntax-highlighting.git /home/vscode/.oh-my-zsh/custom/plugins/zsh-syntax-highlighting
docker cp ~/.personal-devcontainer/.p10k.zsh $CONTAINER_NAME:/home/vscode/.p10k.zsh
docker cp ~/.personal-devcontainer/.zshrc $CONTAINER_NAME:/home/vscode/.zshrc
docker exec $CONTAINER_NAME chsh -s $(which zsh)
Now you can just run ./install.sh javadev to install the preferences to the javadev container (which is our development container name). As I’ll keep changing the script depending on my projects, I’ll publish the installation scripts repo to my git repo.
There are 2 problems with this method -
- You will require to run the script on every rebuild.
- You cannot directly use this script online with
github.dev.
For easier access, let’s create an alias for the script. It will take a container name as a parameter and will configure the shell as required.
.zshrc
...
# configure-personal-dev-container javadev
function configure-personal-dev-container {
	if [[ -z $1 ]]; then
		echo Please provide a container name
		exit 1
	else
		~/.personal-devcontainer/install.sh $1
	fi
}
...
Now, I can run configure-personal-dev-container javadev from anywhere.
Conclusion
Dev container helps us to reduce the setup time for a project. We started with creating a simple dev container configuration. We used the power of dev containers to open the project in VSCode and github.dev. Then we created a complex dev container configuration consisting of Java & Maven with PostgreSQL installation and database creation for an ongoing project at GreyOrange. We tried to compile our project inside the dev container which worked as expected. Then we moved to configure the shell inside the dev container. We tried fish and zsh with powerlevel10k which is what I use locally. We also learned to configure the dev container for personal development without disturbing the source-controlled setup configurations.