A note on creating dynamic link previews for your website or blog
Index
| Topic | Description |
|---|---|
| General Introduction | Understanding link previews |
| Defining meta tags | Open-graph and Twitter mea tags |
| Viewing and Debuggig | Using opengraph.xyz to view your previews |
| Make it dynamic | Create a custom server to generate images |
| Hosting the server on Heroku | Deploy the server on Heroku and test its working |
| Conclusion | Final words |
General Introduction
Using social networking apps, you can add a preview to the URL you share. As a result, the reader can get a decent notion of the contents.
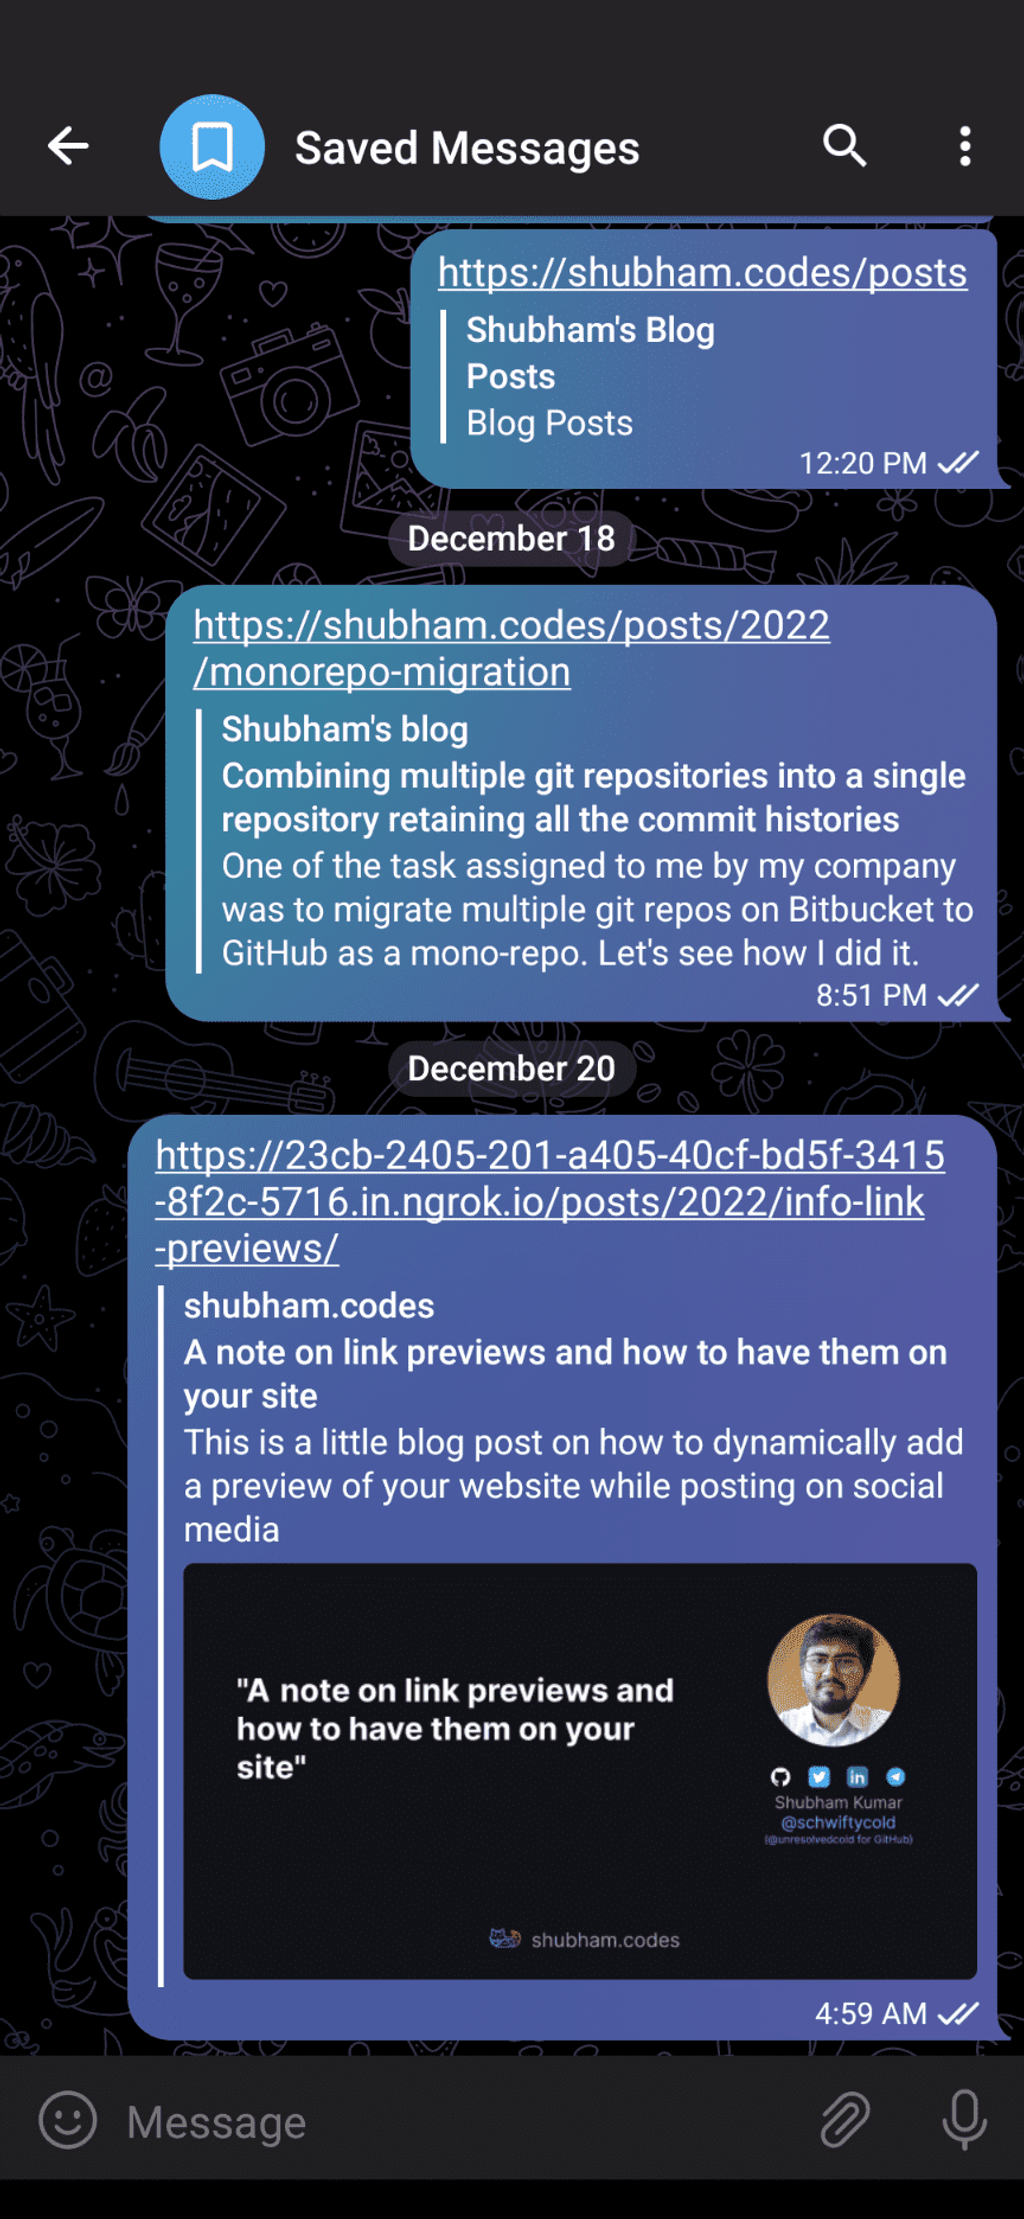
The link shared on Dec 18 shows a preview consisting of a title and description.
This image is dynamically created by the server on receiving the request from the social media app.
A bit of history
Facebook launched the open graph protocol in 2010. This made it possible for the creator to distribute certain data for social media use. This is done using the meta tags. Later on, Twitter launched its tags for Twitter cards. So now, Twitter and Telegram follow Twitter’s meta tags, while Facebook and WhatsApp follow Open Graph’s protocol. Twitter respects the Open Graph protocol if Twitter tags are missing. But it’s always good to have both versions defined.
Defining meta tags
meta tags are defined inside the head. You can define Open Graph tags using og:<key> and Twitter tags using Twitter:<key>. All tags are documented in Open Graph Documentation and Twitter Cards Documentation. Here, I will restrict myself to title, description, image & URL tags as our main focus is on creating dynamic images of a website.
Let’s see how to define meta tags. For this, you can create a simple HTML site with the following contents.
link-preview.html
<html>
  <head>
    <!-- Open Graph metas -->
    <meta property="og:type" content="website" />
    <meta property="og:url" content="a test url" />
    <meta property="og:title" content="My first link preview" />
    <meta property="og:description" content="Learning link previews" />
    <meta
      property="og:image"
      content="https://live.staticflickr.com/7504/16258492451_3a097a932a_k.jpg"
    />

    <!-- Twitter metas -->
    <meta property="twitter:card" content="summary_large_image" />
    <meta property="twitter:url" content="a test url" />
    <meta name="twitter:site" content="shubham.codes" />
    <meta name="twitter:creator" content="@schwiftycold" />
    <meta property="twitter:title" content="My first link preview" />
    <meta property="twitter:description" content="Learning link previews" />
    <meta
      property="twitter:image"
      content="https://live.staticflickr.com/7504/16258492451_3a097a932a_k.jpg"
    />
  </head>
</html>
I’m calling it link-preview.html. I want to show the title of the preview as “My first link preview”. We will use the image hosted by IG as Cool JavaScript Code at Game Jam under Creative Commons License. Later on, we will dynamically display the title on this image.
Viewing and Debuggig
You can use opengraph.xyz to view your previews. Some of the previews I saw on opengraph.xyz weren’t exactly like what I saw on social media sites. But for us, it’s a handy tool to verify our previews.
We need a public link to our website for this to work. Let’s create a simple python HTTP server to serve our ‘HTML’ file.
# List the files in the present directory
> ls
link-preview.html

# Start a python server to serve our files to localhost:8000
> python3 -m http.server 8000
Now, you can browse the contents in the directory by visiting http://localhost:8000
Let’s use ‘locahost.run’ or ‘ngrok’ to make this public. Since there is no need for installation, I’m using localhost.run. Run the below command to forward your port 8000 to localhost.run. This will generate a new public link for your local server. You can verify this by browsing the link.
> ssh -R 80:localhost:8080 nokey@localhost.run

===============================================================================
Welcome to localhost.run!

Follow your favorite reverse tunnel at [https://twitter.com/localhost_run].
...
dbf7d61ace7a14.lhr.life tunneled with tls termination, https://dbf7d61ace7a24.lhr.life
My public link is https://dbf7d61ace7a24.lhr.life. I can view my HTML site by visiting https://dbf7d61ace7a24.lhr.life/link-preview.html.
Let’s feed this URL to opengrapth.xyz.
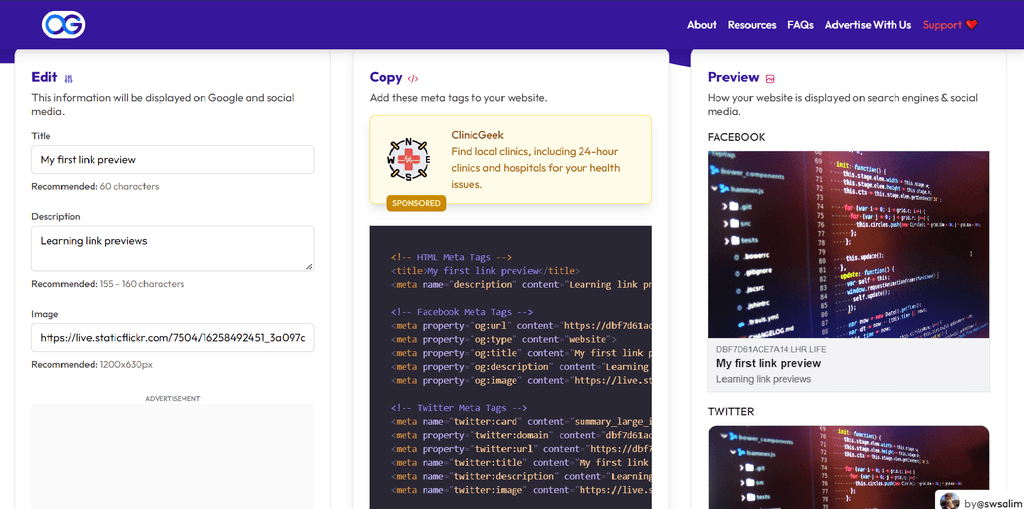
The right-hand side shows you the preview on Facebook, Twitter, Linkedin and Discord.
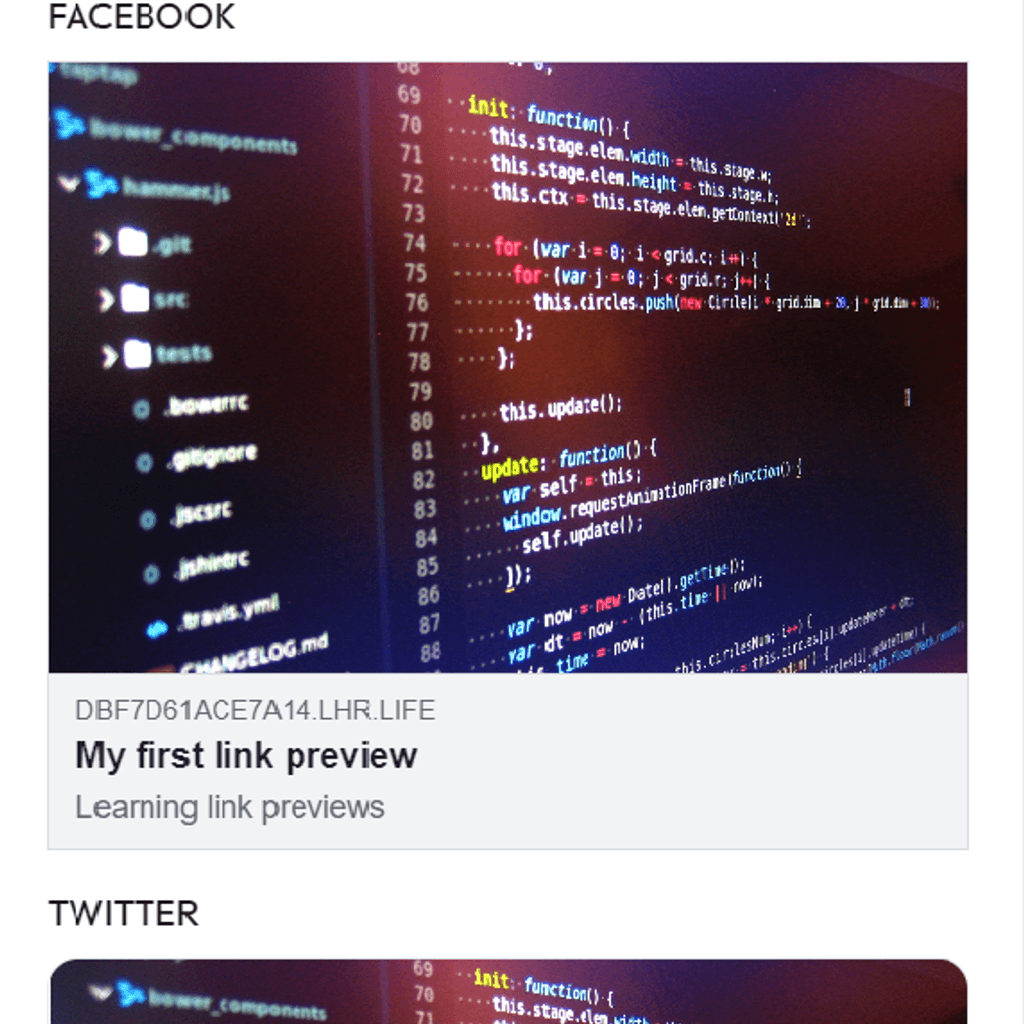
This looks great. The image looks perfect. The provided title and description are also shown as expected.
Make it dynamic
To add a title to the image you’ll need to create a server to generate the image with the title. There are many great libraries to do so. The one I’m using right now is a small modification of Lance Ross next.js implementation. But as we used python for hosting our main page, so let’s stick to it.
The idea is simple. We want to create a server that will look for a GET request with the title as a parameter. In the backend, we want to download this image, resize it to the recommended size and then add our title to it. After we are done with the modifications, we’ll send the image as a response.
We will use Flask as the server. The Pillow module will help us modify the image. And to download the initial image we were using, we will use the get method from the good old module called requests.
requirements.txt
Flask
pillow
requests
Let’s expose /og_image for getting the image.
app.py
from flask import Flask, send_file, request
from PIL import Image, ImageDraw, ImageFont
import requests
from io import BytesIO

app = Flask(__name__)

@app.route('/og_image')
def og_image():
    title = request.args.get('title')

    # This is the recommended size as per opengraph.xyz
    width = 1200
    height = 630

    # Let's get our image
    response = requests.get('https://live.staticflickr.com/7504/16258492451_3a097a932a_k.jpg')
    image = Image.open(BytesIO(response.content))
    image.thumbnail((width, height))      # This is how you resize an image

    # Draw the title on the image
    draw = ImageDraw.Draw(image)
    font = ImageFont.truetype('arial.ttf', 64)  # Font of the title

    # Calculate the x and y positions to center the text
    x = (width - draw.textsize(title, font=font)[0]) // 2
    y = (height - draw.textsize(title, font=font)[1]) // 2

    draw.text((x, y), title, font=font, fill=(255, 255, 0))

    # Save the image to a temporary file
    image.save('og_image.jpg')

    # Return the image
    return send_file('og_image.jpg', mimetype='image/jpeg')

if __name__ == '__main__':
    app.run(debug=True, host='localhost', port=5000)
You can run the server using python app.py. By default, it uses port 5000.
Let’s test if it’s working by visiting localhost:5000/og_image?title=My first Link Preview
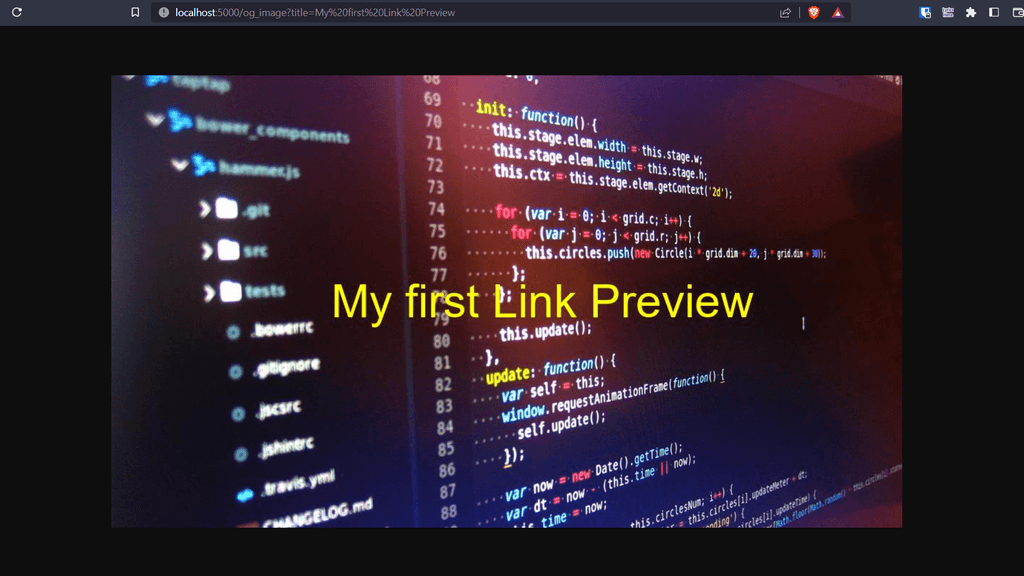
Seems like visiting ”localhost:5000/og_image?title=My first Link Preview” is generating the image along with the title as expected. Now let’s expose this to the public temporarily using localhost.run. This time we will expose the port5000.
> ssh -R 80:localhost:5000 nokey@localhost.run
...
ccfa74e0bbe1c1.lhr.life tunneled with tls termination, https://ccfa74e0bbe1c1.lhr.life
Reverse proxy may fail with the default server. So it is advisable to run the server using Gunicorn.
Instead of opening a directory server, let’s serve our home page directlt from flask. For this, we’ll need to copy the HTML file we created earlier to the templates directory.
Below is what your directory structure will look like.
.
│── templates
│     └── link-preview.html
└── app.py
Modify app.py to serve our contents at the default route.
app = Flask(__name__)
...

# This will be our default route that will serve the home page (we want to generate a preview for this page)
@app.route('/')
def home():
    return render_template('link-preview.html')   # Note: link-preview.html is inside templates directory

@app.route('/og_image')
...
Also, modify the contents of link-preview.html to use our image generator server.
<head>
...
<meta
property="og:image"
content="/og_image?title=My%20first%20link%20preview"
/>
...
<meta
property="twitter:image"
content="/og_image?title=My%20first%20link%20preview"
/>
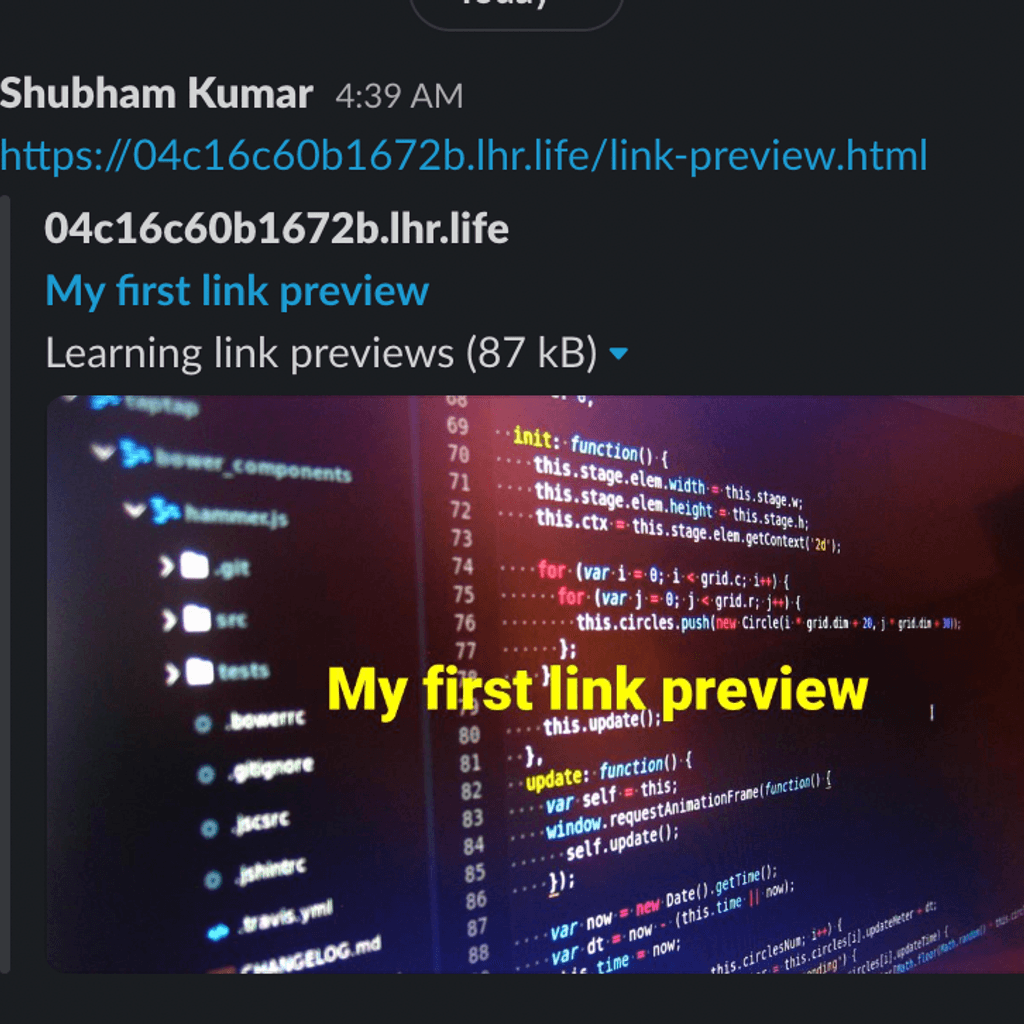
</head>Telegram and Slack are generating the link previews. I don’t know the reason but previewing it on opengraph.xyz was not working for me. Maybe because of a reverse proxy. To test this, I’ll deploy the server on Heroku.
Hosting the server on Heroku
The Flask dev server won’t work with Heroku deployments. Let’s use Gunicorn for our deployments.
Create a new file with the name Procfile with no extensions and modify its contents as below.
Procfile
web: gunicorn gettingstarted.wsgi
web: gunicorn app:app
The first line tells Heroku to use Gunicorn as server. The second line tellsGunicorn to run the app. Gunicorn uses the syntax gunicorn filename:app_name to start a server.
Also, update the requirements.txt file by adding gunicorn.
requirements.txt
Flask
pillow
requests
gunicorn
Now you can use Heroku CLI to host the app following the below steps.
You can install the Heroku CLI using the instructions here.
# First you need git (Heroku uses git)
> git init
> git add .
> git commit -m "My first link preview"

# Login to your account
> heroku Login

# This will create an app and add a remote to your git
> heroku create -a <some-unique-name>

> git remote -v
heroku https://git.heroku.com/<some-unique-name>.git

# To deploy just push your code to Heroku remote
> git push heroku main
Let’s check it on opengraph.xyz.
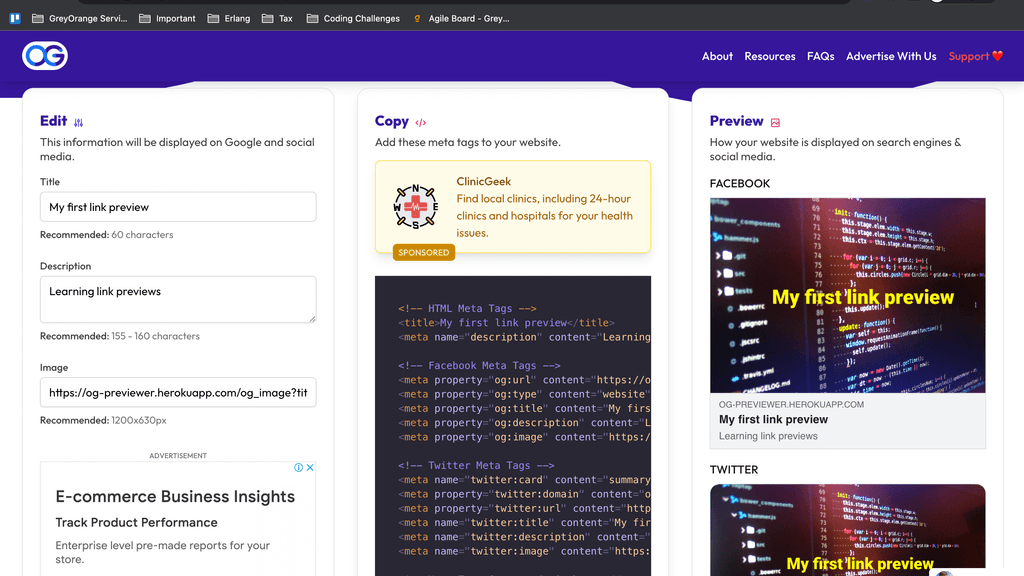
This is exactly what we wanted. Now, we can create multiple HTML files with different titles and our server will generate a preview accordingly.
This was a small demo of generating link previews. You can further customize your server to generate previews based on title, description, publish date and much more.
Conclusion
A dynamic link preview can be generated by hosting a server and pointing our og/twitter image to it. Here we used Flask to create a GET route that provides us with the image. You can add more flexibility/features by using html2img module for generating images from HTML directly. We also saw the process of hosting a Gunicorn server on Heroku. This proved to be more useful in testing our deployment on opengraph.xyz as reverse proxy had some problems.